
2. Assemble the O Watch
Watch the video and follow the step by step instructions below.
Get to know your O Watch main board before you start.
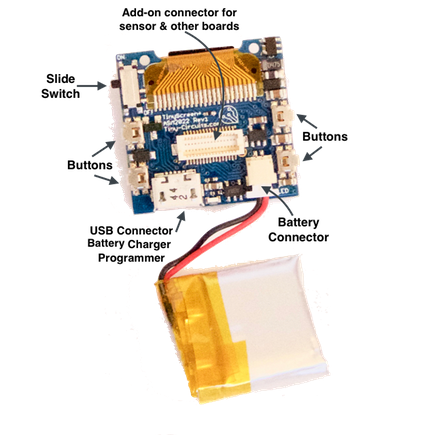
- Connect the battery to main board using the white connectors at the top of the battery. Push it in gently to ensure it is all the way in the connector.
Tip: Hold the main board upside down from the sides with thumb and middle finger with pointer finger supporting it from below. - If you have a sensor board, plug that to the main board. Use provided glue foam tabs to secure the board as shown in the video.
- Secure battery to the center of the main board (or sensor board) using provided glue tabs. Ensure the connecting cables wrap clockwise around to the side (with screen facing down) and stay snug and flat as shown in the video.
- Move the slider switch on the side up to the ON position. If the battery is charged you should see the screen light up. Leave switch in the ON position.
- Lay the watch main case upside down on the table and insert the two pairs of buttons on both sides as shown in the video.
- Gently and carefully insert the connected board(s) with battery into the case, screen facing down and the buttons on the board aligned to the ones on the case. CAREFUL! Do not use force; the screen or other parts can get damaged.
- Check for spacing around the battery. Adjust the position of the battery and connecting wires if they are touching side walls of the case. You do not want anything in the way when you insert the case back enclosure.
- Insert the case back enclosure with the two longer legs aligned to the top of the case and the clasps on the sides aligned along in between the buttons. Again do not force it in. Press gently and if you feel any obstruction remove and clear the sides.
- Once the case back is all the way in and secure, you now have the main unit ready to program.
<< Back: 1. Unbox your O Watch kit | Next: 3. Configure the Arduino Software >>